Your shopping cart is empty!
 DREAM BLINDS
DREAM BLINDS |
How to Measure and Install
No matter what type of blind, measuring windows is easy by following these simple instructions.
Tools you need
- Tape measure (metal ones are best)
- Pen and paper
Inside Mount or Outside Mount?
- Outside Mount Fit
When the blinds are required to install outside the window recess.
- Inside Mount Fit
When the blinds are required to install inside the window recess.
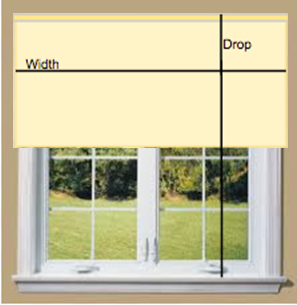
How to measure for an Outside Mount Fit
For all types of blinds follow these instructions if you want your blind to install outside the window recess:
- Measure the exact drop from the top of where you want your blind to be to the bottom. Note the measurement.
- Measure the exact width of where you'd like your blind to be. Note the measurement.
- Write down your measurement of the width, making sure that it is the first number of the measurement—this will be the total width of the roller blind from tip to tip. Keep in mind that the fabric on the roller will be either 40mm or 50mm less than your measured width, see the graphic, so you may want to increase the width measurement to make sure that the fabric is wide enough to cover the window opening.
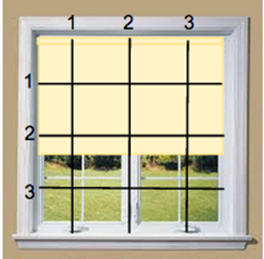
How to measure for an Inside Mount Fit
- Measure the exact width (left to right within 3 places and provide the smaller measurement) of the inside top edge of the window frame. Note the graphic
- We will deduct a small amount to ensure the blinds clear the sides and bottom of the recess, allowing for correct operation. This is generally up to 1cm on either side and up to 1 or 2cm in length.
- Write down that size making sure that it is the first number of the measurement. This is the width you will order.
- Measure the exact height (top to bottom) from the top inside edge down to the windowsill in three places. Note the graphic
- Take the largest of the three measurements.
- Write down that size making sure that it is the second number of the measurement. This is the height you will order.
- Roller shades will be come w/ extra fabric.
- Finished product width and length measurements may vary 5mm.
Note:
Do not attempt to account for fabric deductions by changing measurements on inside mount shades.
Finished product on all inside mount blinds will be made to your size specifications and will be tip to tip. The actual fabric width will be 32mm less than the total measurement for inside mount and chain lifts and will be 37mm less for inside mount and spring lifts.
If you are planning to do a flush mount, please ensure that you have the space required to do so--you'll find the 'Flush mounting space required' under the Features tab for your blinds.
If you are installing 2 or more separate roller shades in the same window, we will design and deductions for customer.
Handy hints
All of our blinds are made to measure. Please follow the instructions carefully. Make sure you take your measurements using a STEEL rule or tape.
Take all your measurements in millimetres (mm).
When measuring, always look out for things like window handles or tiles and take their position into account if necessary, to ensure a perfect fit.
When taking measurements please follow this helpful rule - "measure once, measure twice and measure again to be sure!”
All of our blinds can be fitted into the face of the window frame or wall, or into the top of the lintel. This gives you complete control over the positioning of your blind.
Our vertical blinds are operated with a wand, so bear in mind, when choosing your control side if you want them to bunch to the right then you choose left control and vice versa.
For more information please contact us.
How to install vertical blinds:
A. Getting Started
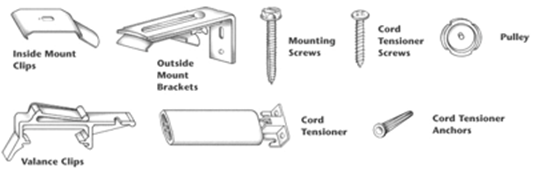
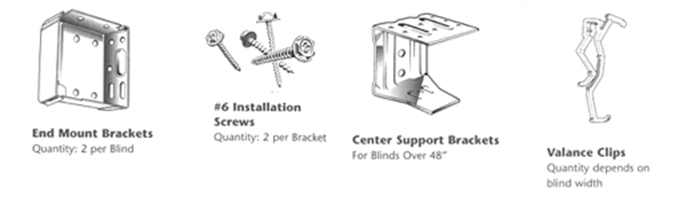
The Parts: Before getting started, please remove and identify the following parts required for the installation of your shades:
B. The Tools
To install your Great Windows Vertical Blinds, you will need a few basic tools:
- Phillips head screwdriver* or
- 1/4" nut Driver*
*Power screwdriver or power drill with a #2 Phillips attachment or 1/4" nut driver attachment may be used.
IMPORTANT NOTE: Screws provided are for installation into wooden frames only. For metal surfaces, use suitable sheet metal screws and pre-drill holes. For concrete, stone, brick, or tile, use a carbide drill and appropriate anchors and screws. For wallboard or plaster, use hollow wall anchors and/or longer screws to reach framing or stud. In all cases, follow the fastener manufacturer's recommendations.
C. Sorting Your Blinds
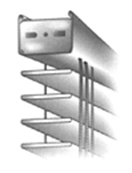
Inside the headrail of your Great Windows Vertical Blinds, there is a sorting label. This appears as seen at right.
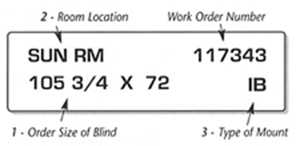
On this label, you will recognize:
- Order size of the blind
- Room location (If not present, info not given at time of order)
- Whether the blind was ordered for inside mount (IB) or Outside mount (OB)
D. Bracket Installation - Mounting Clips
| Blinds Width | Number of Mounting Clips |
|---|---|
| TO 100MM | 2 |
| 100MM TO 1600MM | 3 |
| 1600MM TO 2800MM | 4 |
| 2800MM TO 4000MM | 5 |
Inside Mount With No Valance
If you are inside mounting your blinds with valance proceed to the "Inside Mount With Valance" portion of these instructions.
- Install mounting clips to the underside, top of the window frame.
- Secure with one mounting screw through top of each clip.
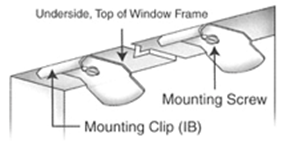
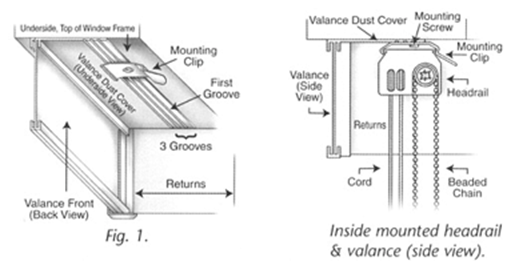
Inside Mount With Valance
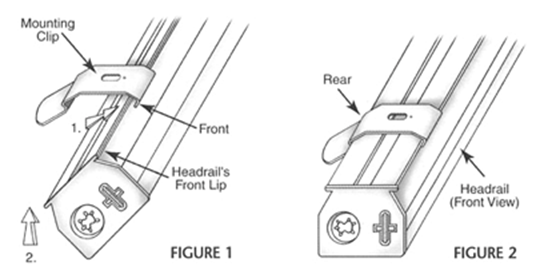
- Place valance to the underside, top of the window frame or ceiling. Position one mounting clip over the first groove on underside of valance's dust cover as shown below. (Figure 1).
- Secure mounting clip and valance to window frame or ceiling with one mounting screw, per clip.
To install your vertical track please proceed to Section E.
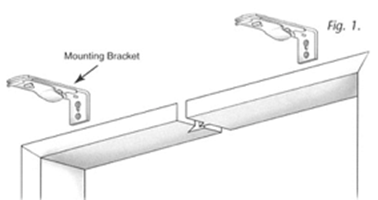
Outside Mount With No Valance
- Install two mounting brackets to the flat surface above the window frame (Figure 1).
- Secure two mounting screws through back of each bracket.
To install your vertical track please proceed to Section E.
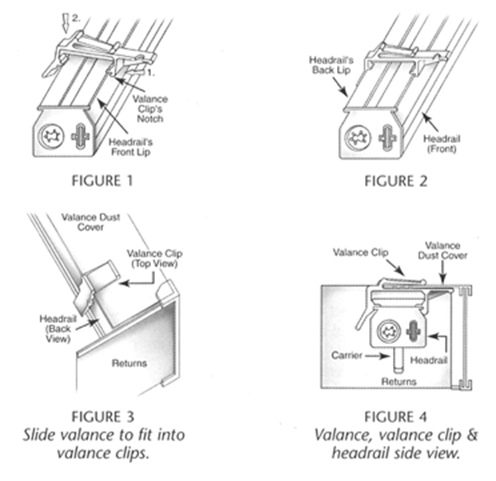
Outside Mount With Valance
- Slide valance clips' front notches into headrail's front lip (Figure 1).
- Push down and snap the back of the valance clips to fit into the headrail's back lip (Figure 2).
To install your vertical track please proceed to Section E.
E. Installing Vertical Track Into Mounting Clips
- Tilt and slip the front lip of the headrail into the front side of the mounting clips (Figure 1).
- Raise and snap the back of the headrail into the rear of the mounting clips so that it fits securely (Figure 2).
F. Installing Vanes Into Carriers
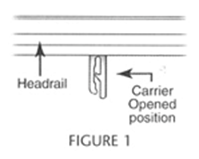
- With headrail traversed closed, pull beaded chain to rotate carriers to the opened position (Figure 1).
- To install vanes push vanes up and snap into carriers (one vane at a time) (Figure 2).
G. Shortening Cord Height
With headrail traversed closed, to adjust cord height on a split draw vertical blind:
- Locate knots on end of cords in lead carrier.
- Select one of the 2 cord ends and pull on the knot.
- Observe the carriers to be sure that they do not traverse when you pull the cord. If they do then select the other cord end. (Caution - cutting wrong cord will damage beyond repair).
- Pull this cord until the cord loop reaches the desired height. Refer to Section H for an illustrated view of cord loop.
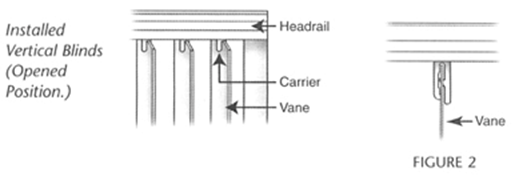
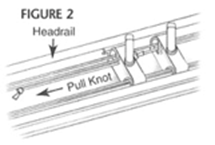
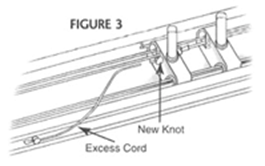
- Tie new knot in cord and cut off excess. To adjust cord height on a one way draw blind, locate knot on end of cord in lead carrier (Figure 1). Pull knot until cord loop reaches desired position (Figure 2). Refer to Section H for an illustrated view of cord loop. Tie new knot in cord and cut off excess (Figure 3).
H. Installing Pulley and Cord Tensioner
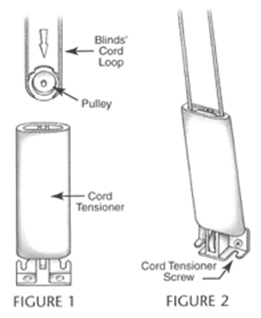
- With headrail traversed closed, to adjust cord height on a split draw vertical blind:
- Wrap blinds' cord loop around pulley then insert pulley and cord loop into tensioner.
- Push pulley into tensioner. Pulley is in position when you hear a snap (Figure 1).
- Use two screws to secure cord tensioner to wall (Figure 2). For hollow walls use screws in conjunction with anchors, provided.
Child Safety
The Consumer Product Safety Commission requires the use of a cord tie down (cord tensioner) on all continuous loop cord systems. The use of such a device is intended to significantly reduce the occurrence of infant or small child strangulation injuries or deaths resulting from the looped pull cords on various window treatment products.
The Cord Tensioner is installed on the Lift Cord before packaging. The Tensioning device should be mounted in the proper position to pull the cord taut in order to reduce the possibility of injury.
Cleaning and Care
In order to keep your window treatments looking new, follow the recommended methods for care and maintenance. Regular care will result in better appearance and performance from your window coverings.
How to install Venetian blinds:
A. Getting Started
The Parts: Before getting started, please remove and identify the following parts required for the installation of your shades:
B. The Tools
To install your Great Windows Wood Blinds, you will need a few basic tools:
- Head screwdriver*
*Power screwdriver or power drill with a #2 Phillips attachment
IMPORTANT NOTE: Screws provided are for installation into wooden frames only. For metal surfaces, use suitable sheet metal screws and pre-drill holes. For concrete, stone, brick, or tile, use a carbide drill and appropriate anchors and screws. For wallboard or plaster, use hollow wall anchors and/or longer screws to reach framing or stud. In all cases, follow the fastener manufacturer's recommendations.
C. Sorting Your Blinds
Inside the headrail of your Great Windows Wood Blinds, there is a sorting label. This appears as seen at right.

On this label, you will recognize:
- Order size of the blind
- Room location (If not present, info not given at time of order)
- Whether the blind was ordered for inside mount (IB) or Outside mount (OB)
D. Inside vs. Outside Mounting
When you ordered your Great Windows Wood Blinds, either inside mount (IB) or outside mount (OB) was specified. Refer to the sorting label for the type of mount you selected and proceed to appropriate instructions.
Each blind is supplied with a left and right bracket. Open the brackets by pressing on the bottom, and lifting the safety door, as shown at right
E. Bracket Installation
Inside Mount
Your Inside Mount Great WindowsTM Wood Blinds have a factory allowance taken for the window frame and bracket clearance. The actual blind measurement will be 1/2" narrower in width than the order size indicated on the sorting label. The manufactured height is 1/4" less than ordered height to allow for proper seating in the brackets. Provided accurate measurements were supplied, this should result in an easy installation and beautiful fit.
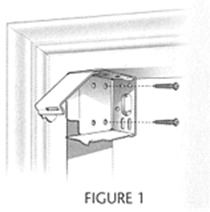
- Place one bracket into the upper corner of the inside window frame (3/4" depth required), as illustrated so that the hinged door is on the front side and opens upward (Figure 1).
- Drill 1/16" pilot holes. Secure with two screws (provided) through either side or top of the bracket.
- Repeat this process for the opposite side.
- If your blinds are 48" or wider, please proceed to Section F. If your blinds are narrower than 48", please proceed to Section G.
Outside Mount
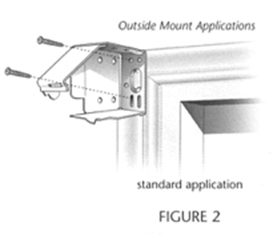
Your Outside Mount Great Windows Wood Blinds are cut to the exact size listed on the sorting label inside the headrail. However, the headrail is cut 3/8" narrower than the slats to allow easy entry into the brackets, and better coverage of the window trim.
- Open the brackets
- Install each bracket, using two screws per bracket, against the surface of the trim, that the door opens upward (Figure 2).
- If your blinds are 48" or wider, please proceed to Section F. If your blinds are narrower than 48", please proceed to Section G.
If your blinds were measured to the edge of the trim (Standard OB):
- Install brackets in the upper corners of the trim as shown (Figure 2).
- Pre-drill screw holes with 1/16" bit to prevent trim from splitting.
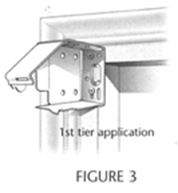
If your blinds were measured to an interior flat area on the face of the trim (1st tier):
- Place brackets against trim at measured blind width (Figure 3).
- Secure with two screws.
- If your blinds are 48" or wider, please proceed to Section F. If your blinds are narrow than 48", please proceed to Section G.
F. Supporting Wide Blinds
Blinds wider than 48" will require the installation of a center support bracket. Blinds over 72" long will have two center support brackets.
If your blinds are narrower than 48" wide proceed to Section G.
Center Supports for Three Ladder Blinds (Applies to Most Blinds)
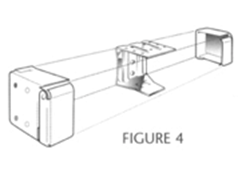
- Offset the center support bracket a couple of inches to the right or left of center. Precise location is not critical so long as bracket is in the vicinity of the ladder(s), but not directly behind it.
- Make sure all center support brackets are positioned so they do not interfere with headrail components.
- Install at same height and depth as end brackets (Figure 4).
Center Supports for 4 and 5 Ladder Blinds
- Position the center support brackets so that they do not interfere with the tape roll supports inside the headrail. Center support should not be directly behind a tape or ladder on the blind.
- For blinds over 72" wide, the two center support brackets must not be spaced more than 48" apart.
- Install at same height and depth as end brackets (Figure 2).
G. Installing Your Blinds into the Brackets
Having installed the left and right brackets, and any necessary center support brackets, you are now ready to install the blind.
- Make certain bracket doors are opened.
- Install as follows.
NOTE: If your blinds are Inside Mount (IB) you should install the valance clips onto the headrail before installing your blind into the brackets. Each blind will require the same number of valance clips as the blind has ladders. Extra clips may be provided. Install valance clips as shown (Figure 1, Section H). This may be done after the blind installation for outside mount blinds.
 Blinds with No Center Support Brackets (Blinds Narrower than 48")
- Remove protective end sleeve from each end of the top slat. Release the cord lock to allow slats to separate from the headrail.
- Slide the headrail of the blind into the opened brackets.
- Close bracket doors making certain they are securely locked.
Blinds with Center Support Brackets
- Remove protective end sleeve from each end of the top slat. Release the cord lock to allow slats to separate from the headrail.
- Slide the headrail of the blind into the end brackets and center support brackets.
- Close bracket doors making certain they are securely locked.
For added stability we recommend driving a sheet metal screw through the hole in the center support bracket into the underside of the headrail.
H. Installing the Valance
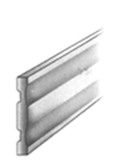
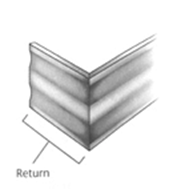
| Valance for Inside Mount Blinds (IB) | Valance for Outside Mount Blinds (OB) |
| The valance for inside mount blinds will not have returns. | The valance for outside mounted blinds (OB) will have returns. |
 |
 |
- Install valance clips if they have not already been installed. Snap valance clip onto headrail as shown. (Figure 5)
- Snap valance into valance clips (Figure 2).
- Placement of valance clips is not critical, but they should be inside of the cord lock and tilter. Operating Your Great Windows Wood Blinds
To raise or lower the blind, pull the cords towards the center and down to release the cord lock. When at the desired height, return the cord to the vertical position to re-engage the cord lock.
Child Safety
At Great Windows child safety is first. Our wood blinds have individual cords with single tassels placed at the bottom of the lift/lower and transverse cords. This prevents any loop from forming which could be hazardous. We also use clear plastic safety washers on the pull cords to minimize any looping that may occur when the blind is used improperly. Cord cleats are also available upon request.
Cleaning and Care
In order to keep your window treatments looking new, follow the recommended methods for care and maintenance. Regular care will result in better appearance and performance from your Great Windows Wood Blinds. Please note that leaving your window open during rain may expose wood to water, which can cause warpage.
Video for Blind Installation
How to install roller blinds:
A few simple tools are required:
- Measuring tape
- Power drill, drill bits
- Hex head and/or Phillips driver bit
- Pencil
BLINDS WITH SIDE CONTROL CHAIN
Bracket positions illustrated are for a blind with the control chain on the right. For a blind with the control chain on the left the brackets should be at the opposite ends. Brackets can be fixed to any flat surface above, behind or to the side of the blind. They must be level to ensure the smooth operation of the blind. Check that the rolled up fabric will not touch any surface. To calculate the spacing between the brackets add 32mm (1 1/4") to the width of the blind fabric. Fix the brackets so that the outsides of the brackets are this distance apart.
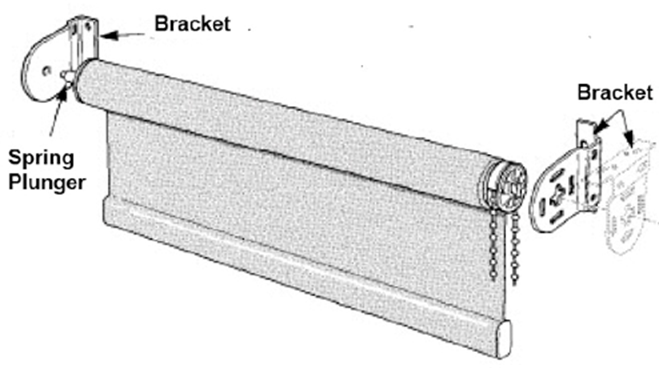
Fitting the Brackets
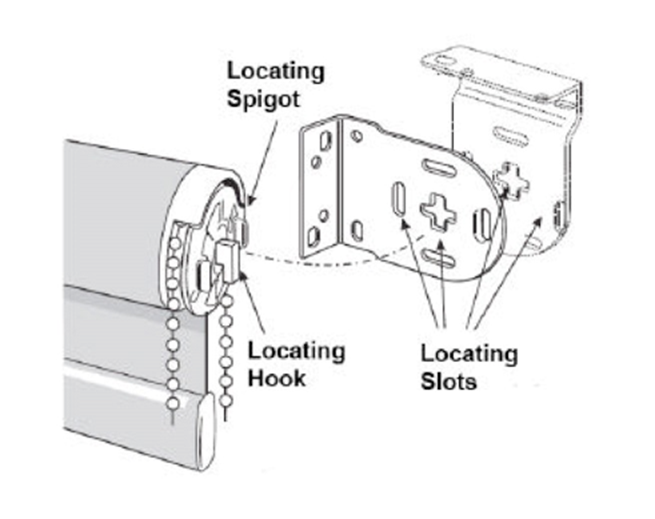
Hold the blind to the brackets with the fabric hanging from the back of the blind. Fit the spring plunger into its bracket. Push the blind into this bracket, depressing the plunger. With the locating hook pointing downwards place the hook into the vertical part of the ‘+’ shaped hole in the bracket. Allow the hook to drop downwards so that it locks into place in the bracket.
Fitting the Blind
ONLINE QUOTE
FREE DELIVERY

MADE IN AUSTRALIA
